Next.jsのブログに簡単にフォームを設置する方法はないかな…と探して、Hyperformを試してみました。
バリデーションとフォームの状態管理はreact-hook-formで行います。
送信時、エラー時のフラッシュメッセージはreact-hot-toastで行います。
設定
hyperformの管理画面のセキュリティから、送信元ドメインからのアクセスを許可するよう設定します。
next.config.mjsに下記を追記し、next.jsのAPIエンドポイントに対してCORSの設定を追加します。
async headers() {
    return [
      {
        source: '/api/:path*',
        headers: [
          {
            key: 'Access-Control-Allow-Origin',
            value: process.env.NEXT_PUBLIC_API_ORIGIN,
          },
          {
            key: 'Access-Control-Allow-Methods',
            value: 'GET, POST, PUT, DELETE, OPTIONS',
          },
          {
            key: 'Access-Control-Allow-Headers',
            value: 'Content-Type, Authorization',
          },
        ],
      },
    ];
NEXT_PUBLIC_API_ORIGINには、開発時はhttp://localhost:3000を指定します。
デプロイ時はvercelのドメインを指定します。
エンドポイントを作る
appフォルダ内にapiフォルダを作り、さらにpostフォルダを作り、その中にroute.tsファイルを作ります。
import { NextRequest } from 'next/server';

export async function POST(request: NextRequest) {
  const body = await request.json();
  const res = await fetch(
    `https://hyperform.jp/api/async/${process.env.HYPERFORM_API}/complete`,
    {
      method: 'POST',
      headers: {
        'Content-Type': 'application/json',
      },
      body: JSON.stringify(body),
    }
  );
  const data = await res.json();
  return Response.json(data);
}
HYPERFORM_APIにHyperformのIDを入れます。
エンドポイントはformタグのaction属性で送信するとAPIで送信するときとで異なることに注意します。
フォームを作る
Form.tsxとして下記コンポーネントを作成します。
'use client';

import { useForm, SubmitHandler } from 'react-hook-form';
import { toast } from 'react-hot-toast';
import TextInput from './TextInput';
import TextArea from './TextArea';
import InputLabel from './InputLabel';
import Button from './Button';
import { Spinner } from './Spinner';

type Inputs = {
  name: string;
  email: string;
  message: string;
};

export default function Form() {
  const {
    register,
    handleSubmit,
    reset,
    formState: { errors, isSubmitting },
  } = useForm<Inputs>();

  const onSubmit: SubmitHandler<Inputs> = async (data) => {
    try {
      const response = await fetch('/api/post', {
        method: 'POST',
        headers: {
          'Content-Type': 'application/json',
        },
        body: JSON.stringify(data),
      });

      if (response.ok) {
        toast.success('送信が完了いたしました!');
        reset();
      } else {
        throw new Error('送信時にエラーが発生しました');
      }
    } catch (error) {
      toast.error('送信時にエラーが発生しました');
    }
  };

  return (
    <>
      <form onSubmit={handleSubmit(onSubmit)} className="max-w-sm mx-auto">
        <div className="mb-4">
          <InputLabel htmlFor="name" value="名前" />
          <TextInput
            id="name"
            type="text"
            {...register('name', { required: true })}
          />
          {errors.name && <span className="text-rose-600">名前は必須です</span>}
        </div>
        <div className="mb-4">
          <InputLabel htmlFor="email" value="email" />
          <TextInput
            id="email"
            type="email"
            {...register('email', { required: true })}
          />
          {errors.email && (
            <span className="text-rose-600">Emailは必須です</span>
          )}
        </div>
        <div className="mb-8">
          <InputLabel htmlFor="message" value="お問い合わせ内容" />
          <TextArea id="message" {...register('message', { required: true })} />
          {errors.message && (
            <span className="text-rose-600">お問い合わせ内容は必須です</span>
          )}
        </div>
        <Button type="submit" isSubmitting={isSubmitting}>
          {isSubmitting ? <Spinner /> : '送信する'}
        </Button>
      </form>
    </>
  );
}
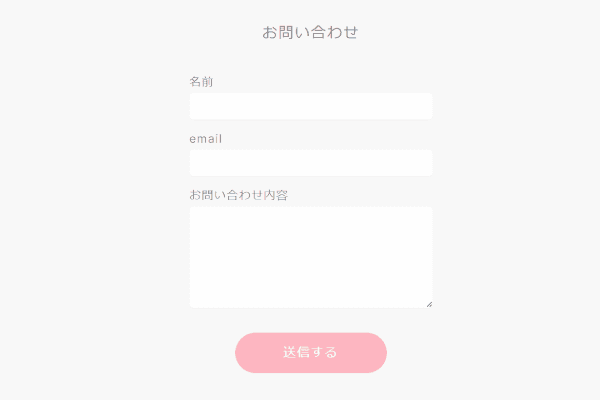
これをpage.tsxにインポートすると、お問い合わせフォームの完成です!
Laravelの開発中にテストメールを送信する時はMailhogのようなツールが必要でしたが、今回は外部メールAPIを利用したフォームなのでリクエストを送るだけでテストメールを送信できます。